Diagnostic Tests and Therapeutic Procedures
Not sure you’re ready?
Take the ~3-minute readiness diagnostic and see where you stand.
The Physics and Plumbing of Patient Care: Mastering Diagnostic Tests and Therapeutic Procedures
Welcome! We are about to dive into one of the most fascinating aspects of nursing. You see, when you look at a patient, you aren't just looking at a person; you are looking at a brilliantly complex biological machine. And just like any complex machine—whether it's a jet engine or a supercomputer—it has a delicate network of wiring, plumbing, and fluid highways.
As a Practical Nurse, you are the chief mechanic of this system. You will be measuring electrical currents, managing fluid pressures, threading tubes through narrow anatomical corridors, and tapping into high-flow venous highways.
We aren’t going to just memorize a list of tasks today. No, we are going to understand why we do what we do. Because when you understand the physical and chemical principles behind a procedure, you don't just become a good test-taker; you become a phenomenal, life-saving nurse.
Let’s get to work.
1. Reading the Heart’s Electrical Field (EKG/ECG)
The heart is an electrical pump. Before the muscle even twitches to push blood, a wave of electricity sweeps across it. An electrocardiogram (EKG or ECG) is simply a way of placing little "antennas" on the skin to "listen" to this electrical broadcast.
But to get a clear signal, the setup has to be perfect.
Prepping the Canvas First, proper skin preparation for an electrocardiogram includes cleaning the skin to ensure accurate lead adhesion. Dirt and oils block the signal and make the stickers fall off. But what if the patient has a hairy chest? Hair acts as a physical barrier and an electrical insulator. Therefore, shaving excess hair at the electrocardiogram lead placement sites reduces electrical impedance, giving you a crisp, clear tracing instead of a static mess.
Once your leads are on, instructing the patient to remain still during an electrocardiogram prevents motion artifacts on the tracing. Muscles run on electricity, too! If the patient shifts around, their skeletal muscles will generate their own electrical noise, drowning out the heart's delicate signal.
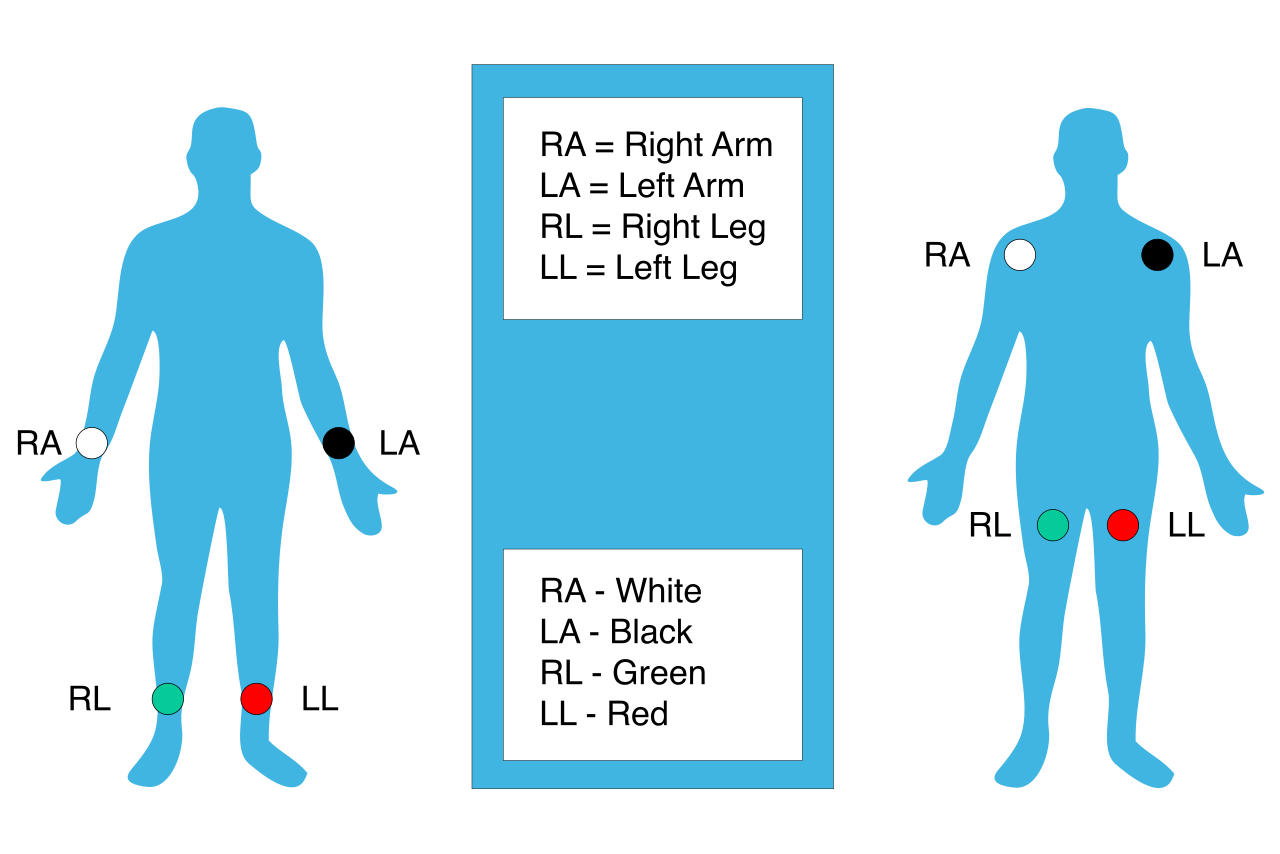
Placing the Antennas (The Leads) You need to know exactly where to place these antennas to get a 3D view of the heart.
- The right arm (RA) electrocardiogram lead is placed on the right shoulder area.
- The left arm (LA) electrocardiogram lead is placed on the left shoulder area.
- The right leg (RL) electrocardiogram lead is placed on the right lower leg.
- The left leg (LL) electrocardiogram lead is placed on the left lower leg.
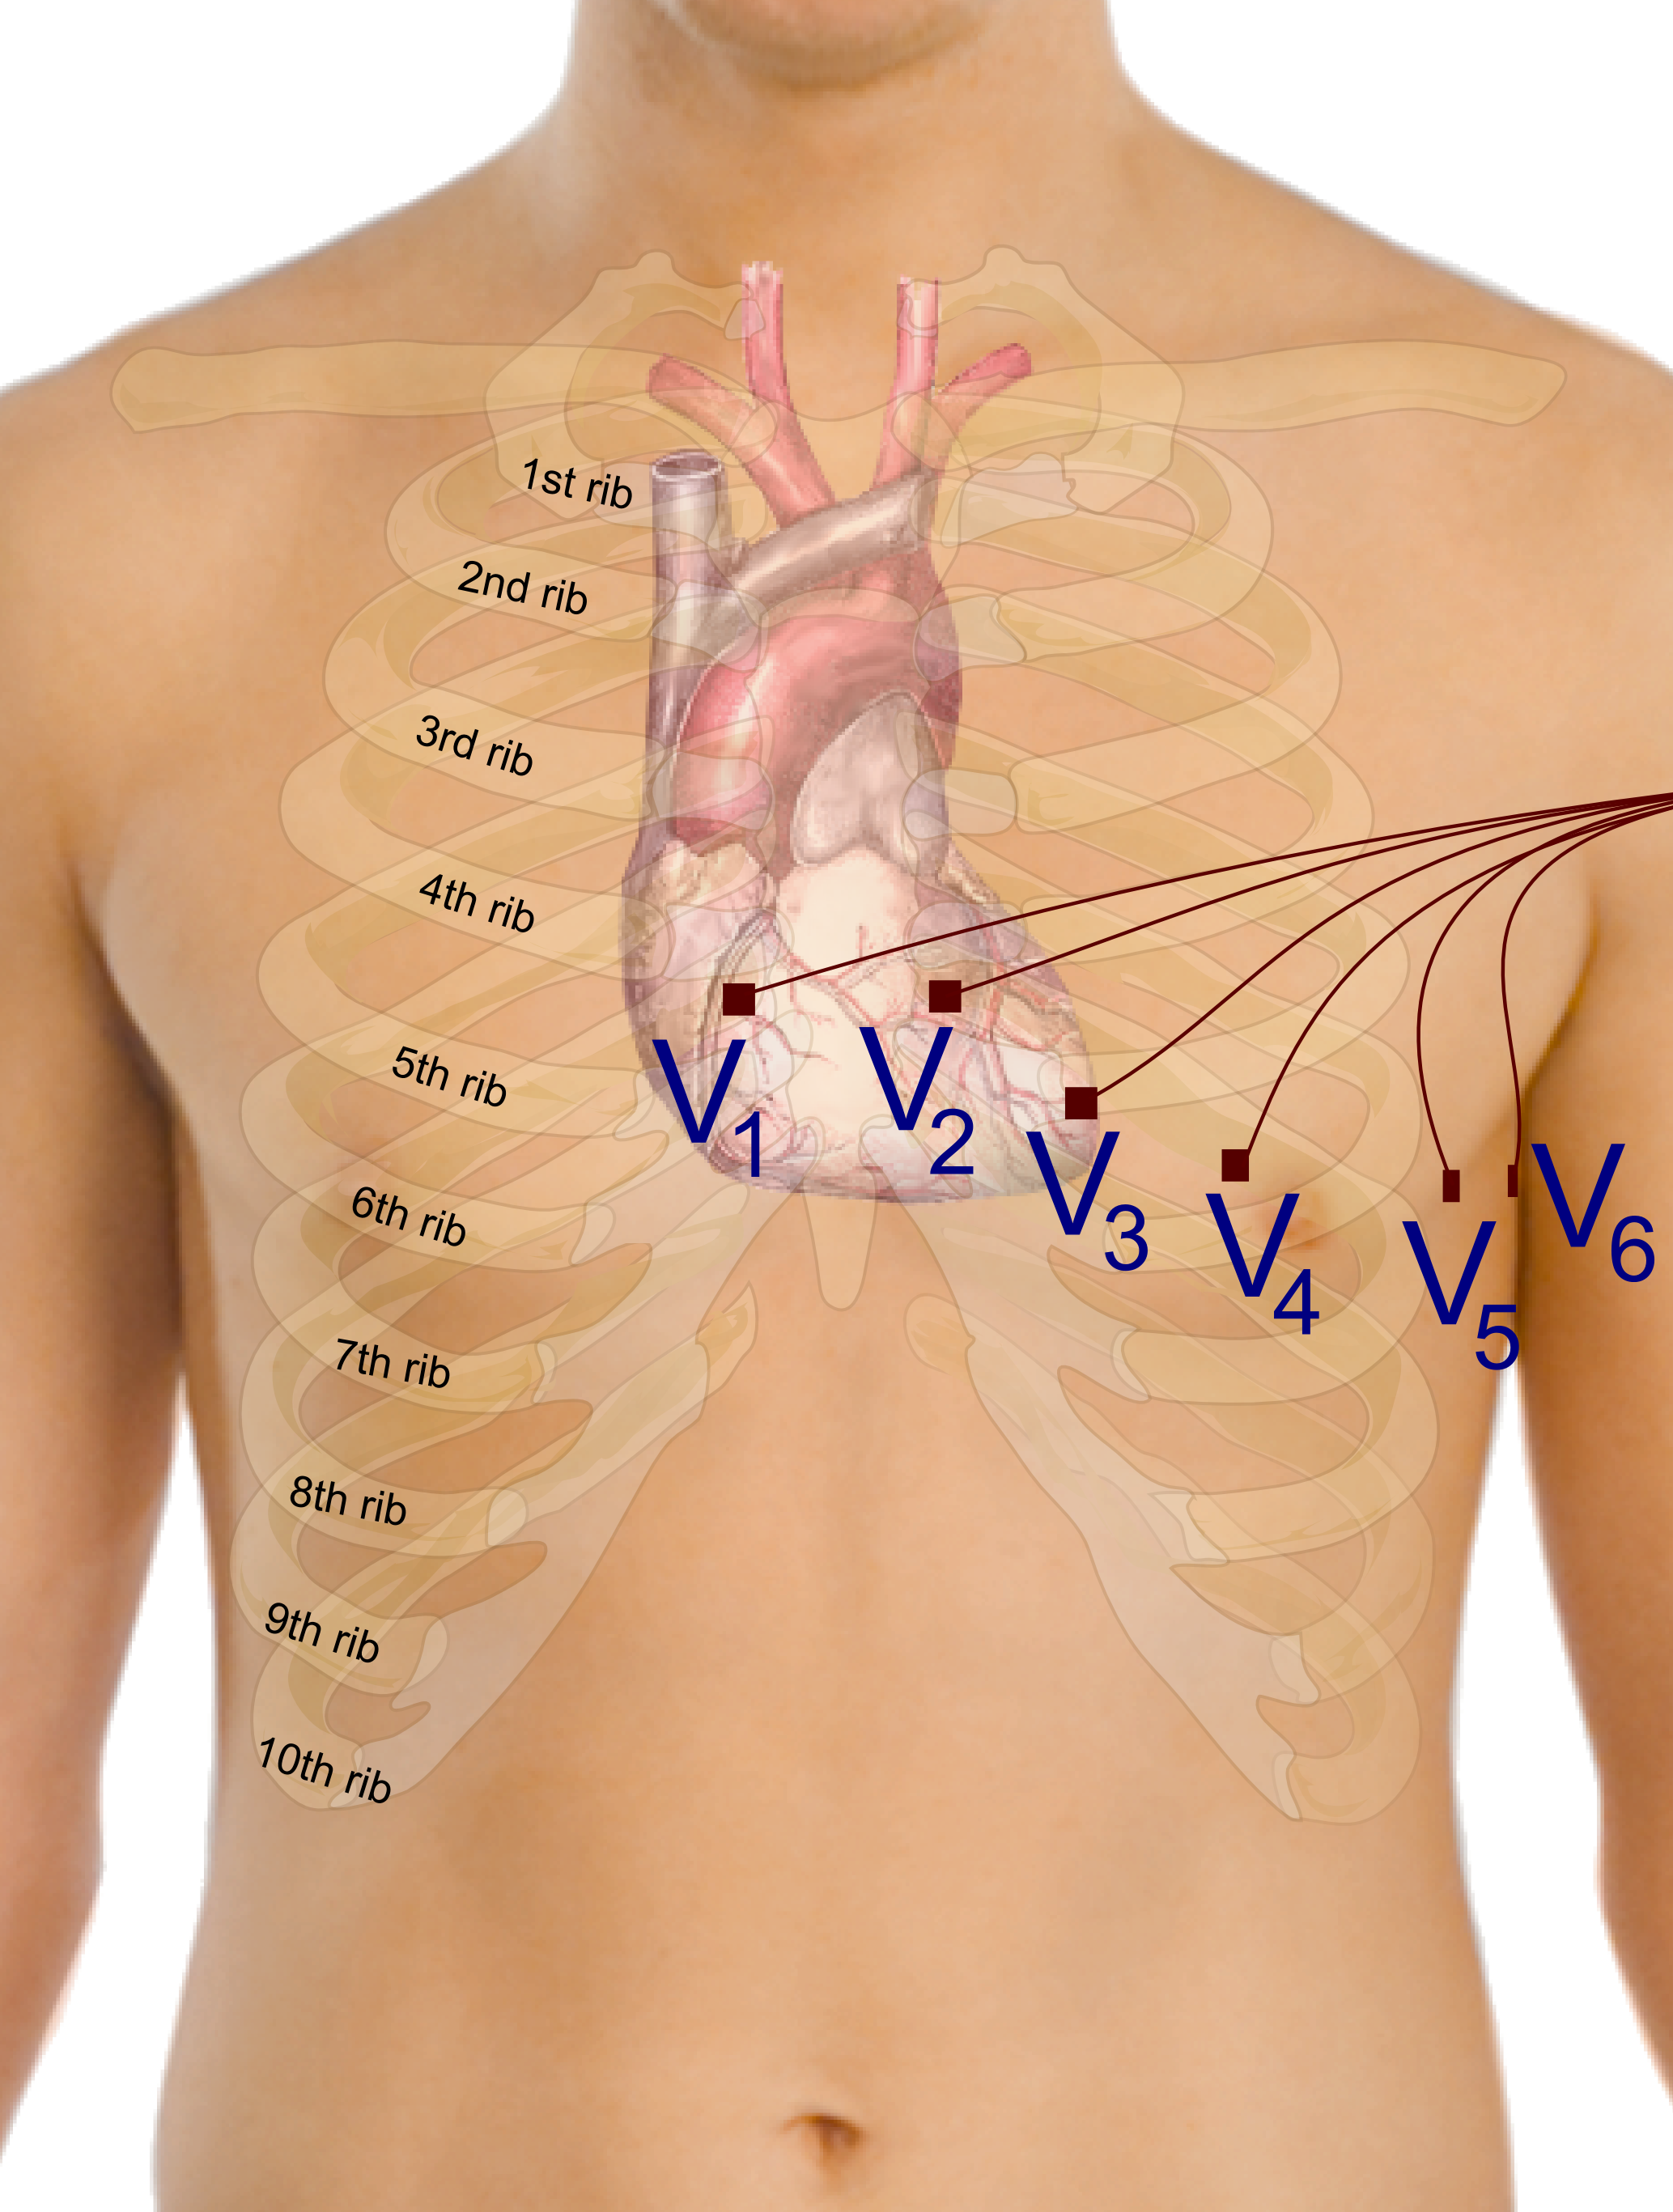
For the chest (precordial) leads, precision is everything. You are mapping specific angles of the ventricles:
- The V1 electrocardiogram lead is placed at the fourth intercostal space at the right sternal border. (This looks directly at the right ventricle).
- The V2 electrocardiogram lead is placed at the fourth intercostal space at the left sternal border.
- The V4 electrocardiogram lead is placed at the fifth intercostal space at the midclavicular line. (Right near the apex of the heart).
2. The Chemistry of a Drop of Blood (Blood Glucose Monitoring)
Now, let's talk about blood glucose. For an adult without diabetes, a normal fasting blood glucose level is typically between 70 and 99 mg/dL.
When you need to measure this, you need a capillary blood sample. You reach for the finger, but where do you poke?
The lateral side of the fingertip is the preferred puncture site for blood glucose testing. Why? Because the center of the finger pad is densely packed with nerve endings designed for touch. Puncturing the center of the finger pad for blood glucose testing causes more pain than puncturing the lateral side.
The Science of the Perfect Drop
- Prep the site: You wipe the finger with alcohol to sterilize it. But wait! Alcohol used to clean a finger prick site must dry completely before the skin is punctured. If it's still wet, the alcohol will mix with the blood, chemically altering the glucose reading and stinging the patient like crazy.
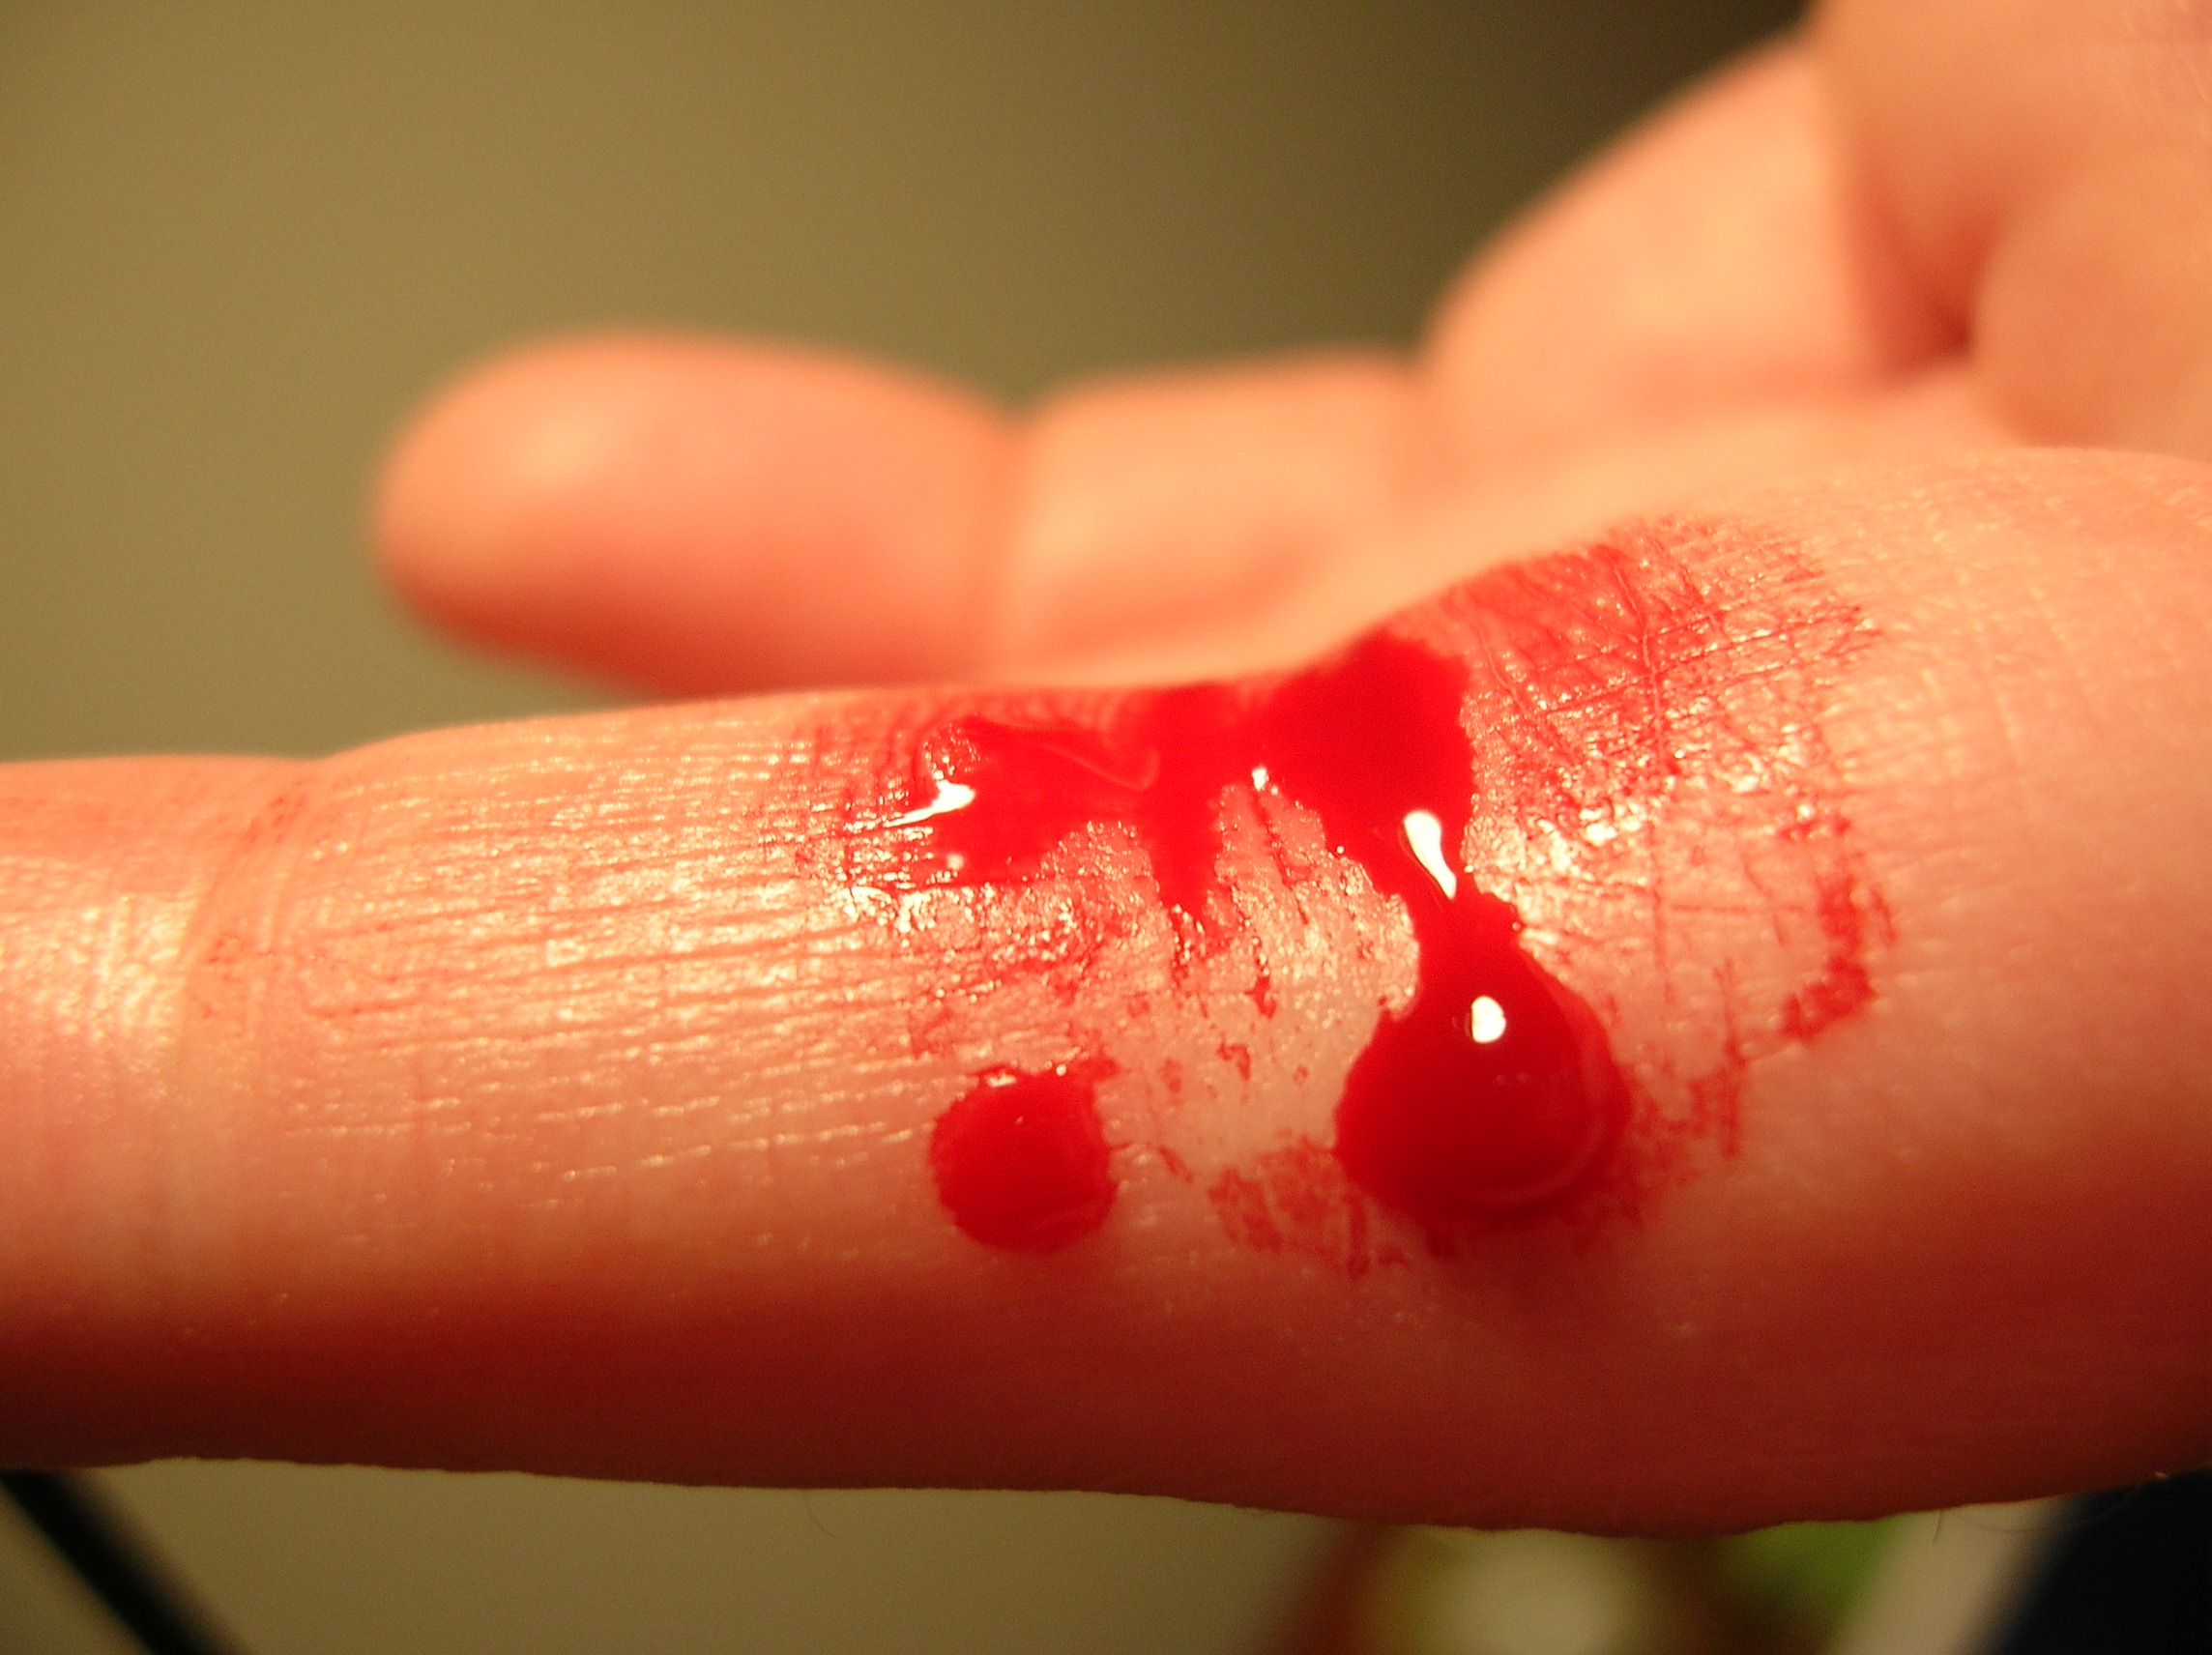
- The First Drop: Once you prick the finger, a drop of blood forms. Wipe it away! Wiping away the first drop of blood during blood glucose testing prevents tissue fluid from diluting the blood sample. That first drop is contaminated with interstitial fluid from the trauma of the needle.
- Getting the Sample: Be gentle. Squeezing the fingertip excessively during blood collection forces tissue fluid into the blood drop. If you milk the finger like a cow, you are watering down the biological soup, resulting in an artificially low, inaccurate reading.
Sometimes, we need to bypass the mouth and go straight to the stomach, either to deliver fuel (feedings) or remove waste (decompression). This brings us to the Nasogastric (NG) tube.
Mapping the Route
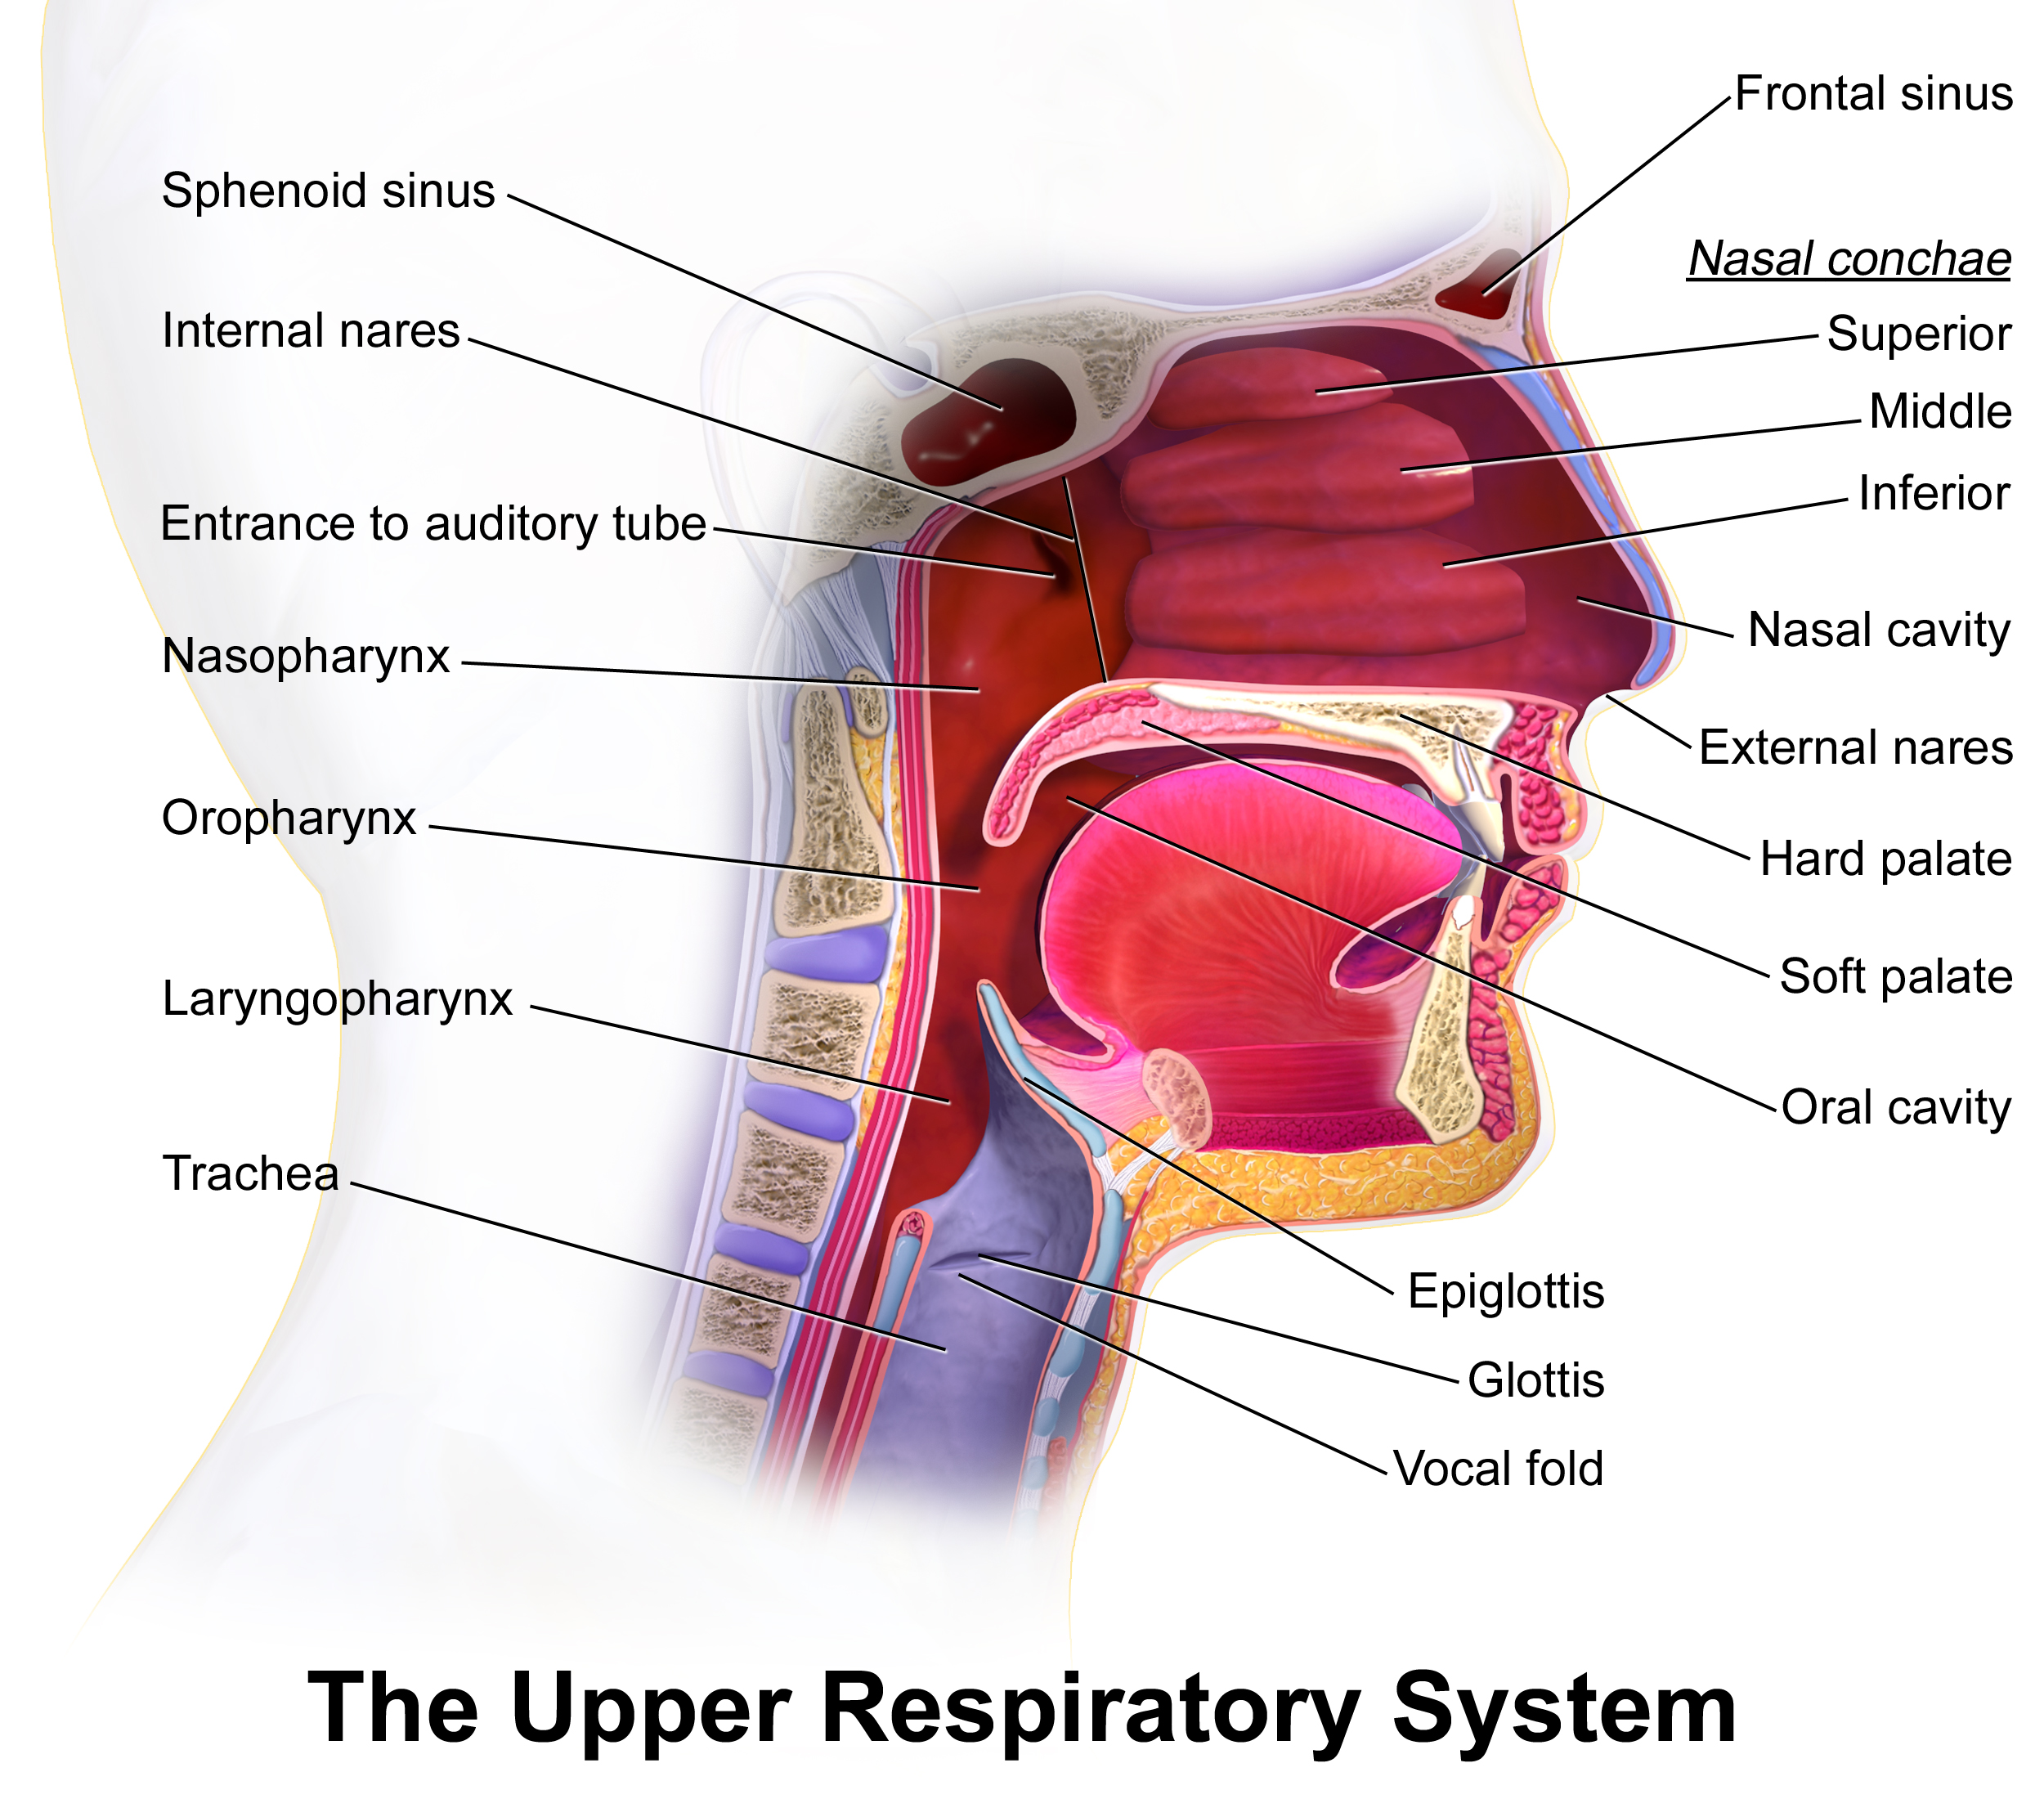
You cannot just guess how much tube to insert. You must measure the pathway from the outside. The insertion length of a nasogastric tube is measured from the tip of the patient's nose to the earlobe and down to the xiphoid process. (Remember the acronym: NEX - Nose, Earlobe, Xiphoid). This accurately estimates the distance through the nasopharynx, down the esophagus, and into the stomach.
The Mechanics of Insertion
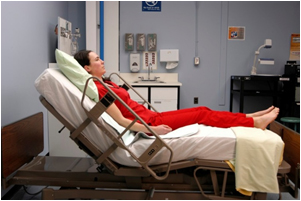
Gravity and anatomy are your best friends here. Placing the patient in a high Fowler's position facilitates the insertion of a nasogastric tube. It opens the airway and aligns the anatomy.
As the tube passes the back of the throat, the body’s natural gag reflex will fight you. You need the body's swallowing mechanism to take over and pull the tube down the right pipe (the esophagus) and not the wrong pipe (the trachea). Therefore, instructing the patient to swallow water during nasogastric tube insertion helps advance the tube into the esophagus.
Verification: Are We in the Stomach?
If you put feeding formula into the lungs, it is a catastrophic, life-threatening event. You must verify placement.
- The Gold Standard: An abdominal X-ray is the most reliable method to verify the initial placement of a nasogastric tube. We want visual, photographic proof.
- The Chemical Check: If an X-ray isn't feasible for subsequent checks, we use chemistry. The stomach is an acid bath. A gastric aspirate pH of less than 5.0 indicates proper placement of a nasogastric tube in the stomach.
Maintenance and Removal
Once the tube is in, it can get clogged with thick formulas or pill fragments. Routine flushing of a nasogastric tube with water maintains tube patency.
When it is finally time to pull the tube out, we face a brief danger. As the tip of the tube comes up past the trachea, any residual fluid inside the tube could drip into the lungs. How do we close the biological door to the lungs? Instructing the patient to take a deep breath and hold it during nasogastric tube removal prevents aspiration. Holding the breath closes the epiglottis, sealing the airway shut while you swiftly pull the tube out.
The bladder is a sterile reservoir. When we introduce a urinary (Foley) catheter, we are opening a direct bridge between the germ-covered outside world and that sterile inner sanctuary. Therefore, insertion of an indwelling urinary catheter requires strict aseptic technique.
Anatomy and Positioning
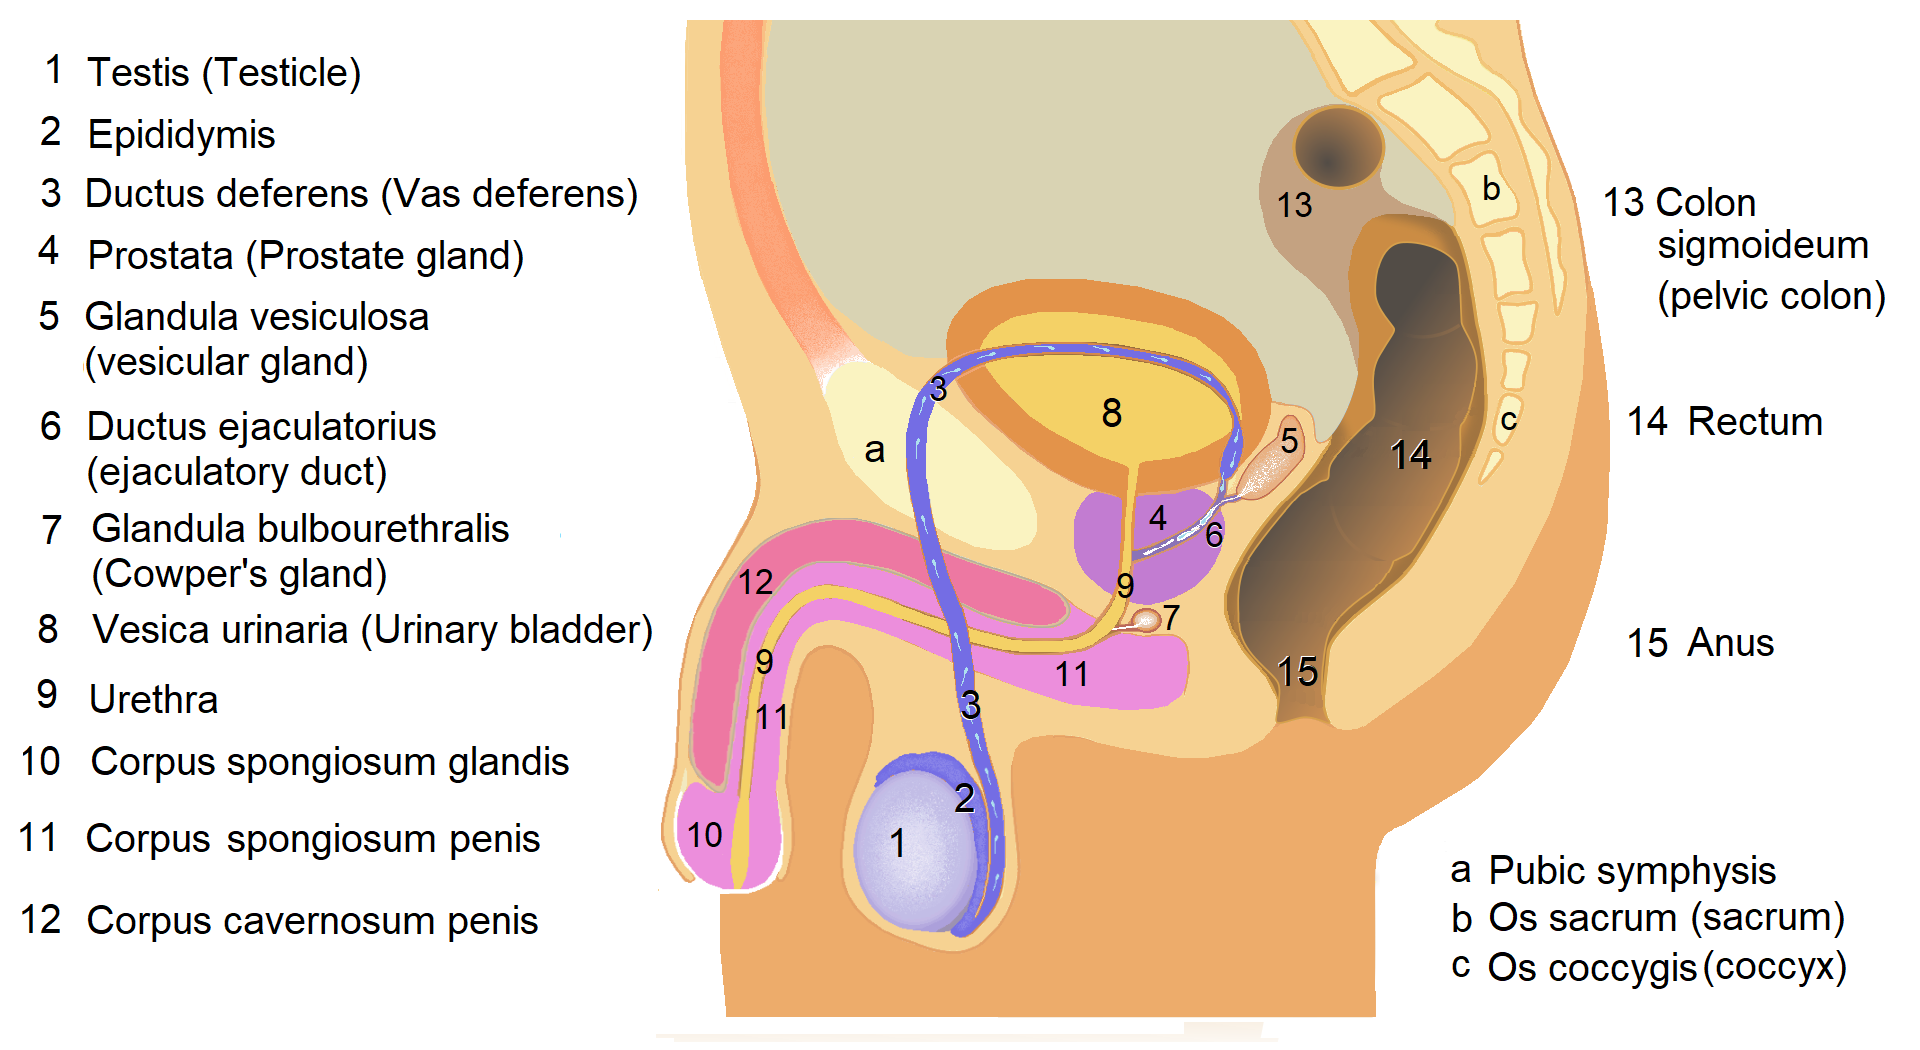
You must optimize the patient's position to visualize the meatus (the opening).
- The dorsal recumbent position is optimal for inserting a urinary catheter in a female patient. (Laying on the back, knees bent, feet flat on the bed).
- The supine position with thighs slightly abducted is optimal for inserting a urinary catheter in a male patient.
The Golden Rule of Catheter Insertion: Resistance encountered during urinary catheter insertion should never be overcome by using force. The male urethra is long and curved; if you hit a stricture or an enlarged prostate and try to ram the catheter through, you will cause severe trauma and bleeding. Stop, reassess, and seek help.
The Foreskin Danger (CRITICAL ALERT)
In uncircumcised males, you must retract the foreskin to visualize the meatus. But listen to me carefully: The foreskin of an uncircumcised male patient must be returned to the original position immediately after urinary catheter insertion.
If you forget this step, the retracted foreskin will act like a tight rubber band around the shaft of the penis, cutting off venous blood return. Failure to replace the retracted foreskin of a male patient after urinary catheter insertion can cause paraphimosis, a massive, painful swelling that is a severe medical emergency.
Fluid Dynamics and Maintenance
Urine flows via gravity. The urinary catheter collection bag must be kept below the level of the patient's bladder. Why? Because water runs downhill. Keeping the urinary catheter bag below the bladder prevents the backflow of urine into the bladder. If old, stagnant, bacteria-rich urine flows back into the bladder, you have just guaranteed the patient a nasty urinary tract infection (UTI).
Furthermore, a catheter swinging loose is a hazard. A urinary catheter must be secured to the patient's inner thigh or lower abdomen. By anchoring it, securing the urinary catheter prevents accidental dislodgment and urethral trauma from the balloon being yanked against the internal bladder sphincter.
Safe Removal
When taking the catheter out, the internal balloon that holds it in place must be neutralized. The urinary catheter balloon must be completely deflated before catheter removal. Pulling an inflated balloon through the urethra is exactly as excruciating and damaging as it sounds.

Once out, look closely at the tube. Intactness of the urinary catheter tip must be verified immediately after removal. If a piece is missing, it means it broke off inside the bladder, which will require surgical retrieval.
Finally, we arrive at the bloodstream—the body's superhighways.
1. Central Venous Catheters (CVCs)
A Central Venous Catheter sits directly in the vena cava, mere inches from the heart. It is a massive, high-volume intersection.
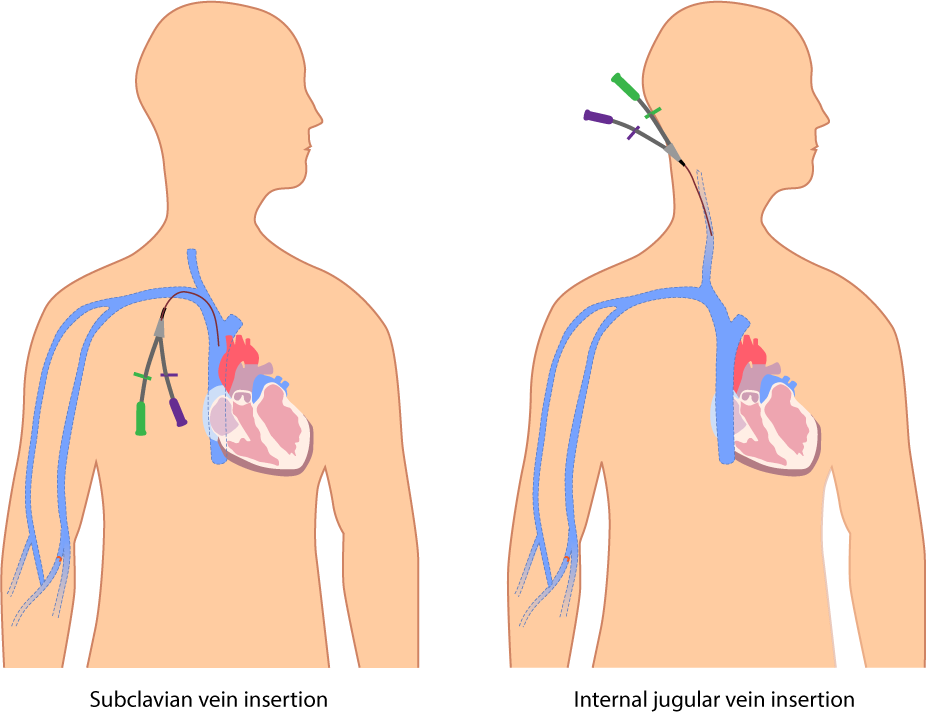
The LPN's Role and Asepsis While RNs or physicians insert these lines, practical nurses maintain central venous catheters by performing sterile dressing changes. Because this line leads straight to the heart, infection control must be ruthless. Chlorhexidine is the preferred antiseptic solution for cleaning central venous catheter insertion sites. It has incredible residual bacterial-killing power.
Before you ever attach a flush or medication, you must clean the connection point. Scrubbing the hub of a central venous catheter before accessing it reduces the risk of bloodstream infections. (Friction is your friend here. Scrub it like you mean it!)
Maintenance and The Physics of Flushing To keep this highway clear of blood clots, pulsatile flushing techniques are used to maintain patency in central venous catheters. By pushing the flush in quick, short bursts (push-pause-push-pause), you create turbulent fluid dynamics inside the catheter that powerfully scrubs the inner walls free of fibrin buildup.
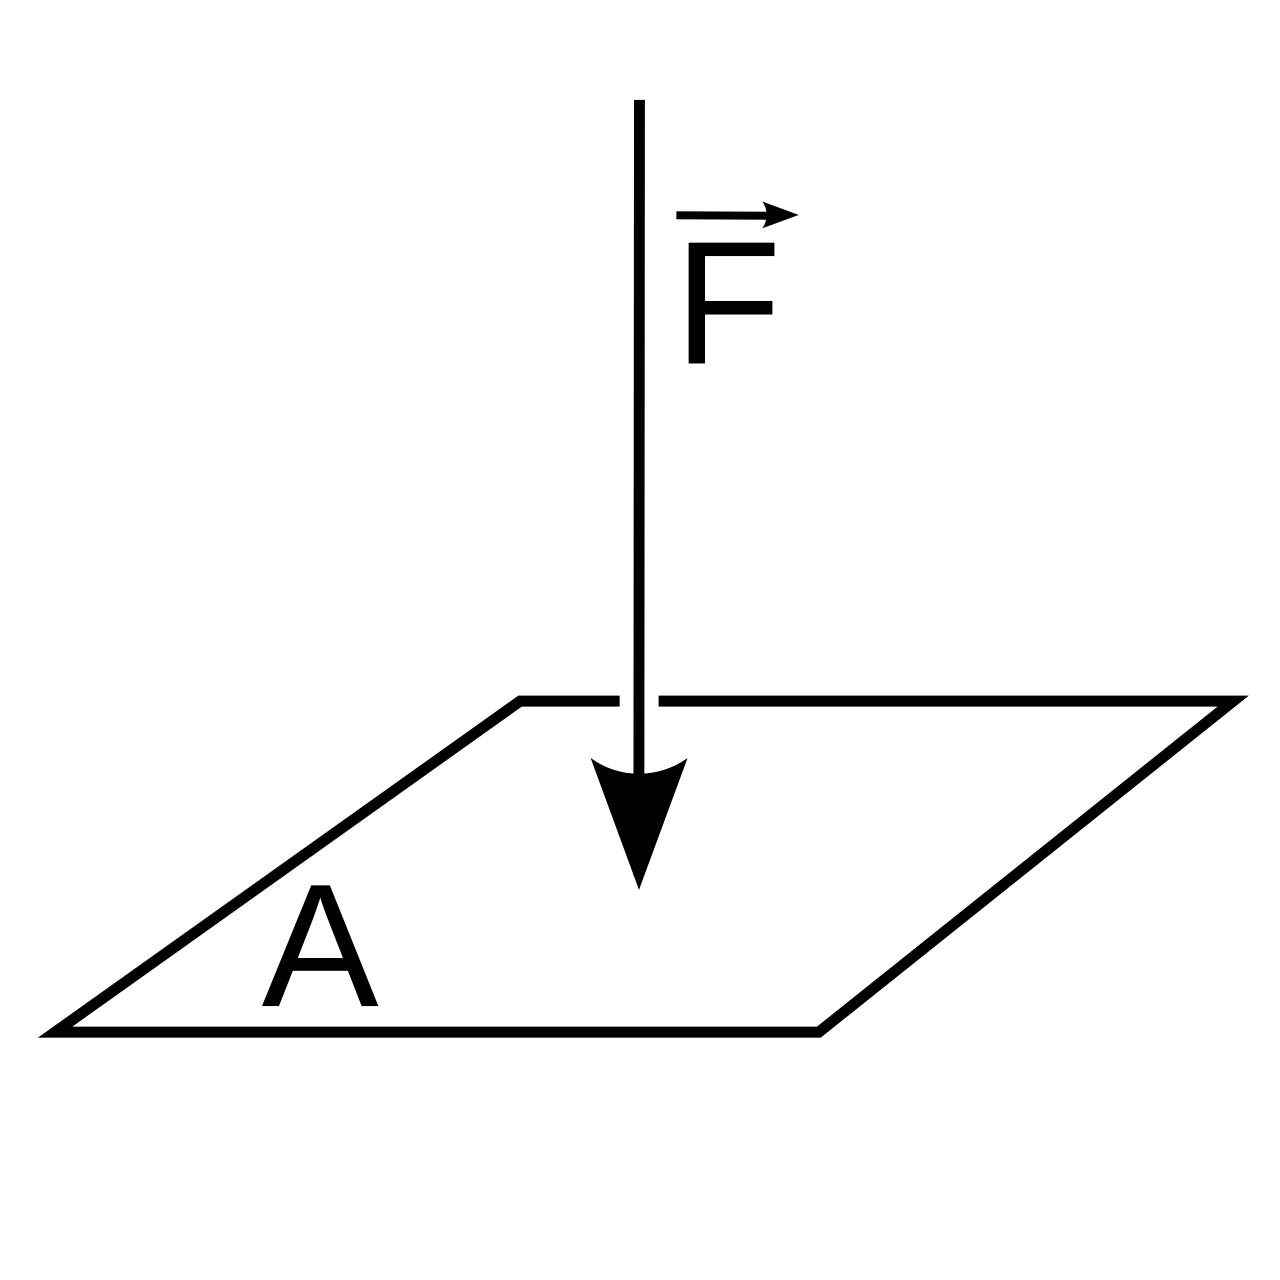
Now, a quick lesson in physics: Using a 10-mL syringe or larger for flushing a central venous catheter prevents excessive pressure from rupturing the line. Wait, doesn't a smaller syringe mean less pressure? No! In physics, Pressure equals Force divided by Area (P=F/A). A tiny 3-mL syringe has a very small plunger area. If you push on it with your thumb, you concentrate all your force into a tiny space, creating astronomically high internal pressure that can literally blow the central line apart inside the patient's chest! Always use a 10-mL barrel or larger.
The Invisible Enemy: Air The pressure inside the central veins is very low. If the catheter is left open to the air, the negative pressure of the chest can literally suck room air right into the patient's heart, causing a fatal air embolism.
- Clamping the central venous catheter lumen when not in use prevents air from entering the patient's bloodstream.
- During a dressing change, when the site is momentarily exposed, instructing the patient to bear down during a central venous catheter dressing change increases intrathoracic pressure to prevent an air embolism. This is called the Valsalva maneuver. By bearing down, the pressure in the chest becomes higher than the atmospheric pressure, pushing air away rather than sucking it in.
2. Peripheral Intravenous Catheters (PIVs)
Peripheral IVs are the smaller side-streets located in the arms or hands. They are delicate and prone to failure. You must read the tissue to know what is going wrong.
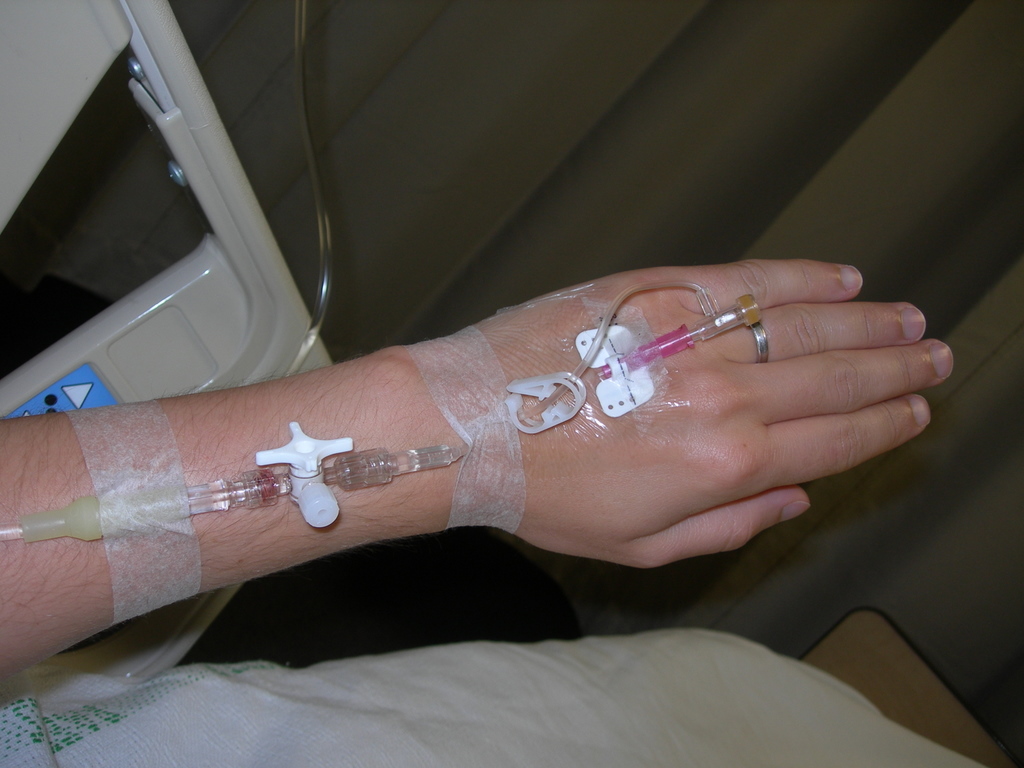
| Complication | Signs & Symptoms | What is happening physically? |
|---|---|---|
| Infiltration | Swelling and coolness at a peripheral intravenous site indicate possible fluid infiltration. | The catheter has poked through the vein wall. Room-temperature IV fluid is leaking into the surrounding tissue, causing it to puff up and feel cold. |
| Phlebitis | Redness and warmth at a peripheral intravenous site indicate possible phlebitis. | The vein is angry and inflamed due to mechanical irritation or chemical burn from medications. The body sends inflammatory markers to the site, generating heat and redness. |
Safe Removal When it is time to discontinue the peripheral IV, removing a peripheral intravenous catheter involves applying firm pressure over the site with sterile gauze. Keep the pressure steady to allow the body's clotting cascade to plug the hole in the vein.
And just like the Foley catheter, you must examine your equipment when you are done. Intactness of the peripheral intravenous catheter tip must be verified immediately after removal to ensure no fragments remain in the vein. A sheared-off IV tip floating through the venous system acts as a plastic embolus, traveling straight toward the lungs or heart.
Final Thoughts
Look at what you’ve just mastered! You aren't just memorizing rules; you are applying principles of electrical impedance, fluid dynamics, anatomy, and physics to keep your patients safe. When you approach the NCLEX—and more importantly, the bedside—remember the why behind the what.
Keep questioning, keep exploring, and go out there and be brilliant mechanics of the human body!